What is the 4-step sketch solution?
The 4-step sketch is an ideation activity in a design sprint to create a solution in a structured and effective manner. It’s usually done on Day 2 of a sprint, using the input from previous activities, such as goal setting, how might we challenge and the lightning demo.
There are 4 steps in this process, hence the name, and they are doable for anyone of any skill level. Contrary to the word “sketch”, you don’t need any drawing skills beyond knowing how to draw basic boxes, lines, and shapes. This is about being creative, not showcasing your art skills.
For most of this process, you will be working on your own solution but be together in the same room or session. You can talk, ask questions, and exchange notes or opinions throughout, but you will be developing your own idea.
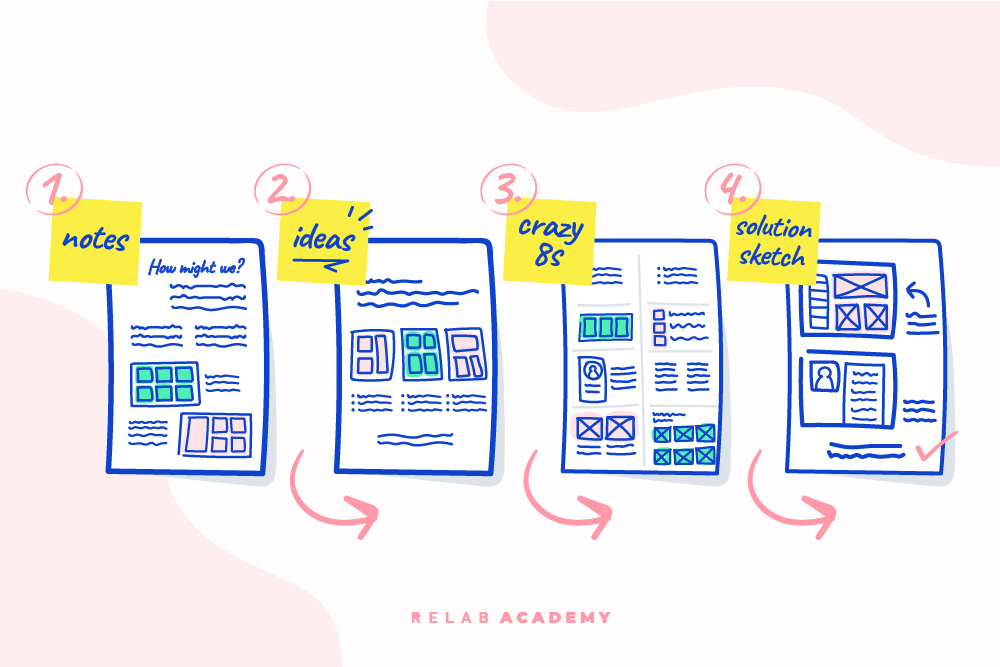
The steps are:
- Note taking
- Idea writing
- Crazy 8’s
- 3-step sketch
You’ll need:
- Sharpies and pen
- Paper
- Blue tac or tape
- Glue and scissors (optional)
Step 1: Note taking
If you’re running a design sprint, your room would be plastered with things you’ve discussed such as the challenge, agreed goals, and a board on design inspiration. Note taking is about soaking all those things in, as a springboard to generate a solution. You’re gearing up your brain to craft a solution and writing and sketching is the best way to get started.
Everyone will go around the room and jot down the important details of the issue you’re trying to solve. Now’s the time to ask further questions and clarify things. If you’re running a remote design sprint, the concept is the same. Allow everyone time to go over everything you’ve voted on and capture the challenge, users, goal, questions, inspiration, etc.
Time: 20 mins
Step 2: Idea writing
Now, you’re going to start sketching a few ideas. The purpose of this isn’t to devise a final solution, it’s to get you started on a solution. Get the creative juice flowing, put on some focus music, make that cup of coffee, and draw away.
Each person is going to spend the next 20-30 minutes exploring the ideas they have in their head. By now, you’d have a good grasp of the goal and a silhouette of the solution. Doing this individually means you will have multiple ideas to choose from later.
This is when the notes you wrote in the previous session comes in handy. Sketch a few wireframes and low-fidelity drawings to convey your idea. For example, if you’re building a new shopping app for your store, draw the crucial elements and user flow such as the home page, listing page, and checkout page.
Time: 20-30 mins
Step 3: Crazy Eights
I’ve written in detail how to run a Crazy 8s session. In summary, this session is when you let your mind flow freely and draw one solution per minute for 8 minutes. Everyone will have 8 different variations of their solution at the end of it.
It’s about reducing overthinking and second guessing. No solution is right or wrong. It’s about expanding the idea you’ve worked on in the previous activity to hash out a better picture of what it would look like.
Time: 20 – 30 mins
Step 4: 3-step sketch
This is the longest part of the process. I usually allow for 2 hours. Depending on the challenge, the participants, and your sprint, it can take less or more time.
The 3-step sketch is to refine your idea into 3 big steps or process, falling into one umbrella theme. I’d encourage you to name your idea because this will help during the voting session. For example, you can name your shopping app solution as “A Bespoke Approach”. That’s the theme you’re going for, offering users a bespoke experience when they shop with you.
The 3 steps or ideas would be the personalised home page, the listing page with recommended products, and the fast checkout process. Don’t add your name on it because you want the voting session to be neutral and bias-free, if possible.
You can use anything you want to bring your idea to life. Glue, scissors, coloured pens, and colour papers, you can take your pick. Or just a pen and paper will do. People will be voting on your ideas next, so you want to present it nicely for people to understand it fully.
Time: 2 hours
If you’re interested, I’ve also done a video where I show how you can run a remote session of a 4- step sketch. Check out my YouTube channel called “Relab Studios”. Do subscribe if you find the videos helpful because I post new stuff regularly there.
In summary
The 4-step sketch will usually end the day of your sprint. Everyone’s usually tired by the end of it, which takes up the full afternoon.
Paste every solution onto a wall or upload them to your virtual whiteboard in a remote session. This is to prepare for the next day’s activity, which is the silent art museum voting session. Don’t forget to thank everyone for their massive effort and remind them what’s happening tomorrow.
And now you’re done. Can you do a 4-step sketch activity out of a design sprint? Of course, you can. The concept and purpose are the same, to generate many solutions in a structured process. Try it the next time you’re stuck producing a good solution.